About
Personal Folders can be created in Microsoft Outlook so that you can store, manage, and archive your e-mail on your local computer's hard drive. By using Personal Folders, you may reduce the amount of space used on the central mail server, and avoid receiving warning messages that you are over quota.
Information Technology provides 100 MB of storage space for each Exchange e-mail account. To check how much space you are using, in Microsoft Outlook, right-click Mailbox - Your Full Name, click Properties, and click the Folder Size button. This will show you the total amount of space used by your e-mail account as well as the amount of space being used by each individual folder.
WHY USE
It is important to remember that any messages in your Personal Folders are stored on your local computer's hard drive and not on the server. If your computer's hard drive ceases to work or the .pst file is deleted or becomes corrupted, the messages you've placed in this folder will be lost. To protect yourself from data loss, make certain to back up your .pst file regularly to another location such as your personal or departmental network storage on WAREHOUSE or other media such as a CD or removable USB drive.
HOW TO CREATE
1. Select the File menu, point to New, and click Outlook Data File.
2. In the New Outlook Data File window, select Office Outlook Personal Folders File (.pst), and click OK.
3. In the Create or Open Outlook Data File window, in the File name box, enter a name for the file, and click OK.
4. In the Create Microsoft Personal Folders window, in the Name box, enter a name to use for this folder if you would like it named other than Personal Folder, and click OK.
5. The folder will now be listed in the All Mail Folders section of the Navigation Pane.
SOURCE: uwyo.edu
Showing posts with label how to. Show all posts
Showing posts with label how to. Show all posts
January 20, 2010


January 18, 2010
January 13, 2010
How to Make the Performance of Windows 7 Faster
1. Use a Solid State Drive (SSD)
Installing Windows 7 onto a solid state hard drive (SSD) instead of a normal SATA or IDE hard drive will dramatically increase your computer's performance.
2. Install the Latest BIOS and Device Drivers
Make sure that you have the latest available drivers installed for all of your devices and BIOS version for your motherboard. Check at the device's website for them. Be sure to have the correct versions for your 32 bit or 64 bit Windows 7. If you do not have Windows 7 drivers available, then you can often times use Vista drivers instead with sometimes having to use Compatibility Mode on the driver installation file with Vista selected.
3. Install More RAM
The more you have the better your performance can be up to a point. Usually 3 GB (32-bit) or 4 GB (64-bit) will be the most that you will need though unless you do memory intensive actions such as video editing.
4. Turn Transparency Off
The glass transparency effect uses the most resources from the Aero feature. You can disable it without disabling Aero.
5. Turn Off Unneeded Visual Effects
Uncheck the visual effect options that you do not want or need, or select the Adjust for best performance option, to increase the speed. You can optimize performance by changing how menus and windows appear. The most common visual effects to uncheck are:
* Animate windows when minimizing and maximizing
* Animations in the taskbar and Start Menu
* Enable transparent glass
* Fade or slide menus into view
* Fade or slide ToolTips into view
* Fade out menu items after clicking
* Show shadows under windows
* Slide open combo boxes
6. Enable Write Caching for Storage Devices
This option is usually the best choice for storage devices that must provide the highest possible performance and that you intend to not remove from the system frequently, such as internal hard disk drives.
7. Disable or Remove Unwanted or Unneeded Startup Programs
Double check through your startup programs and disable or remove the ones you do not want to have start when Windows 7 starts. It is a good idea to check these every once in awhile to help make sure that some unknown program or malware has not placed itself to startup with Windows 7.
8. Disable Unused Services
Services use processes that run in the background using part of your computer's resources. Check through your services with the help of the guide provided in this link, and disable the services that you do not use or need.
9. Turn Off Unneeded Windows Features
Windows 7 includes many features. You can review the list of features and turn off the ones that you do not want or need.
10. Turn Off Disk Defragmenter Schedule
By default Disk Defragmenter is scheduled to run in the background automatically every so often in Windows 7. Having this running in the background can cause a slight slow down and extra hard drive activity. You should either set the schedule to run at a time when you are not using the computer while it is on, or turn it off and run Disk Defragmenter manually when it is convenient for you instead.
11. Defragment Your Hard Disk
Fragmentation makes your hard disk do extra work that can slow down your computer. This will show you how to open and use Disk Defragmenter to manually analyze and defragment your disks and drives in Windows 7.
12. Disable Hibernate
If you do not use hibernate, then disabling it will save you a GB size file from being saved on your hard drive when you put the computer into hibernation mode.
13. Turn Off System Protection
If hard drive space is at a high premium for you, then turning System Restore off will save you a good bit of hard drive space. When disabled it will also not run in the background anymore while it creates restore points. However, disabling System Restore will mean that there will be no restore points available to go back to in the event of a problem with your Windows 7 system files. You will need to create backups or system images if you disable System Restore instead incase you need to reinstall.
14. Speed Up the Menu Show Time
This will allow you to reduce the amount of time it takes for a menu in Windows 7 to pop, fade, or slide open when you run the mouse pointer over it.
15. Enable High Performance in the Power Plan
This power plan maximizes system performance and responsiveness. However, if you use a mobile PC running on battery power, then you will notice that your battery doesn't last as long when using this plan.
16. Speed Up Mouse Hover Time
This will show you how to change the delay time, in milliseconds, that the mouse pointer has to stay hovered on a item before it is selected or opens a pop-up in Windows 7.
17. Reduce Time to Display Operating Systems at Boot
This will show you how to change the amount of time to display a list of operating systems in the Windows Boot Manager screen at boot and wait for you to select a OS to start before the default OS starts automatically. If you do not dual boot with another operating sytem on your computer, then you can uncheck, or reduce the time as low as it will go, to save on how long it takes to boot your computer.
18. Add or Remove Gadgets
Gadgets can be handy to offer information at a glance and provide easy access to frequently used tools from your dekstop. However, since each gadget added will take up some of your system resources. You can see how much memory is being used by the gadgets in Task Manager (Ctrl+Shift+Esc) under the Processes tab with the sidebar.exe process.
19. Run Disk Cleanup
Running Disk Cleanup every so often will help find and remove unnecessary files on your hard disk to free up disk space and help your computer run faster.
20. Speed Up Shut Down Time
This will allow you how to set the Wait to Kill time Windows 7 waits for programs to save data and close before shutting down.
21. Add COPY TO FOLDER and MOVE TO FOLDER to Context Menu
This will allow you how to add Copy To Folder and Move To Folder to the context menu to make copying and moving files faster and easier in Windows 7.
22. Log On Automatically to a User Account
This will show you how to select a user account to have Windows 7 automatically log on to at startup so that you do not have to spend time manually logging on to the user account everytime you start or restart the computer.
23. Disable Require a Password on Wakeup
If you use sleep, hybrid, or hibernate mode, then you may wish to disable the option to have your computer require you to enter a password everytime you wakeup the computer.
24. Use Sleep Mode
If your computer does not run primarily off of a battery, then using sleep mode will allow you to put your computer to sleep and wake it up quickly instead of completely shutting down and starting the computer.
25. Decrease How Long Windows 7 Notifications Stay Open
This will allow you to change how long notifications or messages are displayed in the Windows 7 taskbar notification area before they close automatically.
26. Disable Thumbnail Previews in Windows Explorer
If there are a lot of thumbnails in a Windows Explorer window, then it can slow down your computer while you wait for the thumbnails to load. If this happens or you prefer icons instead of thumbnails, then disabling thumbnails will speed up how fast a Windows Explorer window will open by displaying only icons instead of thumbnails.
27. Turn On ReadyBoost
You can use ReadyBoost in Windows 7 with USB flash drives and flash memory cards to help speed up your computer.
28. Uninstall the Bloatware Programs from Your Computer Most computers that you buy, at a retail store (OEM), have a ton of software installed on it. Some of these can take up a lot of resources. Uninstall the programs that you do not want to use from Programs and Features.
SOURCE: SEVEN FORUM
Installing Windows 7 onto a solid state hard drive (SSD) instead of a normal SATA or IDE hard drive will dramatically increase your computer's performance.
2. Install the Latest BIOS and Device Drivers
Make sure that you have the latest available drivers installed for all of your devices and BIOS version for your motherboard. Check at the device's website for them. Be sure to have the correct versions for your 32 bit or 64 bit Windows 7. If you do not have Windows 7 drivers available, then you can often times use Vista drivers instead with sometimes having to use Compatibility Mode on the driver installation file with Vista selected.
3. Install More RAM
The more you have the better your performance can be up to a point. Usually 3 GB (32-bit) or 4 GB (64-bit) will be the most that you will need though unless you do memory intensive actions such as video editing.
4. Turn Transparency Off
The glass transparency effect uses the most resources from the Aero feature. You can disable it without disabling Aero.
5. Turn Off Unneeded Visual Effects
Uncheck the visual effect options that you do not want or need, or select the Adjust for best performance option, to increase the speed. You can optimize performance by changing how menus and windows appear. The most common visual effects to uncheck are:
* Animate windows when minimizing and maximizing
* Animations in the taskbar and Start Menu
* Enable transparent glass
* Fade or slide menus into view
* Fade or slide ToolTips into view
* Fade out menu items after clicking
* Show shadows under windows
* Slide open combo boxes
6. Enable Write Caching for Storage Devices
This option is usually the best choice for storage devices that must provide the highest possible performance and that you intend to not remove from the system frequently, such as internal hard disk drives.
7. Disable or Remove Unwanted or Unneeded Startup Programs
Double check through your startup programs and disable or remove the ones you do not want to have start when Windows 7 starts. It is a good idea to check these every once in awhile to help make sure that some unknown program or malware has not placed itself to startup with Windows 7.
8. Disable Unused Services
Services use processes that run in the background using part of your computer's resources. Check through your services with the help of the guide provided in this link, and disable the services that you do not use or need.
9. Turn Off Unneeded Windows Features
Windows 7 includes many features. You can review the list of features and turn off the ones that you do not want or need.
10. Turn Off Disk Defragmenter Schedule
By default Disk Defragmenter is scheduled to run in the background automatically every so often in Windows 7. Having this running in the background can cause a slight slow down and extra hard drive activity. You should either set the schedule to run at a time when you are not using the computer while it is on, or turn it off and run Disk Defragmenter manually when it is convenient for you instead.
11. Defragment Your Hard Disk
Fragmentation makes your hard disk do extra work that can slow down your computer. This will show you how to open and use Disk Defragmenter to manually analyze and defragment your disks and drives in Windows 7.
12. Disable Hibernate
If you do not use hibernate, then disabling it will save you a GB size file from being saved on your hard drive when you put the computer into hibernation mode.
13. Turn Off System Protection
If hard drive space is at a high premium for you, then turning System Restore off will save you a good bit of hard drive space. When disabled it will also not run in the background anymore while it creates restore points. However, disabling System Restore will mean that there will be no restore points available to go back to in the event of a problem with your Windows 7 system files. You will need to create backups or system images if you disable System Restore instead incase you need to reinstall.
14. Speed Up the Menu Show Time
This will allow you to reduce the amount of time it takes for a menu in Windows 7 to pop, fade, or slide open when you run the mouse pointer over it.
15. Enable High Performance in the Power Plan
This power plan maximizes system performance and responsiveness. However, if you use a mobile PC running on battery power, then you will notice that your battery doesn't last as long when using this plan.
16. Speed Up Mouse Hover Time
This will show you how to change the delay time, in milliseconds, that the mouse pointer has to stay hovered on a item before it is selected or opens a pop-up in Windows 7.
17. Reduce Time to Display Operating Systems at Boot
This will show you how to change the amount of time to display a list of operating systems in the Windows Boot Manager screen at boot and wait for you to select a OS to start before the default OS starts automatically. If you do not dual boot with another operating sytem on your computer, then you can uncheck, or reduce the time as low as it will go, to save on how long it takes to boot your computer.
18. Add or Remove Gadgets
Gadgets can be handy to offer information at a glance and provide easy access to frequently used tools from your dekstop. However, since each gadget added will take up some of your system resources. You can see how much memory is being used by the gadgets in Task Manager (Ctrl+Shift+Esc) under the Processes tab with the sidebar.exe process.
19. Run Disk Cleanup
Running Disk Cleanup every so often will help find and remove unnecessary files on your hard disk to free up disk space and help your computer run faster.
20. Speed Up Shut Down Time
This will allow you how to set the Wait to Kill time Windows 7 waits for programs to save data and close before shutting down.
21. Add COPY TO FOLDER and MOVE TO FOLDER to Context Menu
This will allow you how to add Copy To Folder and Move To Folder to the context menu to make copying and moving files faster and easier in Windows 7.
22. Log On Automatically to a User Account
This will show you how to select a user account to have Windows 7 automatically log on to at startup so that you do not have to spend time manually logging on to the user account everytime you start or restart the computer.
23. Disable Require a Password on Wakeup
If you use sleep, hybrid, or hibernate mode, then you may wish to disable the option to have your computer require you to enter a password everytime you wakeup the computer.
24. Use Sleep Mode
If your computer does not run primarily off of a battery, then using sleep mode will allow you to put your computer to sleep and wake it up quickly instead of completely shutting down and starting the computer.
25. Decrease How Long Windows 7 Notifications Stay Open
This will allow you to change how long notifications or messages are displayed in the Windows 7 taskbar notification area before they close automatically.
26. Disable Thumbnail Previews in Windows Explorer
If there are a lot of thumbnails in a Windows Explorer window, then it can slow down your computer while you wait for the thumbnails to load. If this happens or you prefer icons instead of thumbnails, then disabling thumbnails will speed up how fast a Windows Explorer window will open by displaying only icons instead of thumbnails.
27. Turn On ReadyBoost
You can use ReadyBoost in Windows 7 with USB flash drives and flash memory cards to help speed up your computer.
28. Uninstall the Bloatware Programs from Your Computer Most computers that you buy, at a retail store (OEM), have a ton of software installed on it. Some of these can take up a lot of resources. Uninstall the programs that you do not want to use from Programs and Features.
SOURCE: SEVEN FORUM
September 28, 2009
How to Backup a Blog on Blogspot to Your PC
Recently, I changed this blog to a new look using a 3 column template. I will create a separate entry how I change from 2 column to 3 column template. Before migrating to a new template, I had a fear that my blog entries might disappear because of a bug of the new template or some other reasons.
So, I consulted again my virtual bestfriend, GOOGLE for the answers. Google search results listed many ways on how to backup a blogspot blog such as using a software, a built in exporter, email, etc. but only one backup method that catched my interest and attention. This is by viewing all your blog entries on a single page then save the page to your PC or hard drive. Easy, isn't it.
So here it is the "HOW TO", happy reading....
1. Type this address in the address bar
where:
XXX - URL of your blog minus the blogspot.com extension
N - number of blogs entries you want to backup, make it higher if you are not sure
illustration:
I have blog entries which is less than 100. So, I types below URL to the address bar of my internet browser.
2. Then issue a "Save As" command and locate your folder in your hard drive where do you want to store you blogs. Easy, isn't it.
>>> END
So, I consulted again my virtual bestfriend, GOOGLE for the answers. Google search results listed many ways on how to backup a blogspot blog such as using a software, a built in exporter, email, etc. but only one backup method that catched my interest and attention. This is by viewing all your blog entries on a single page then save the page to your PC or hard drive. Easy, isn't it.
So here it is the "HOW TO", happy reading....
How to Backup a Blogspot Blog
1. Type this address in the address bar
http://XXX.blogspot.com/search?max-results=N
where:
XXX - URL of your blog minus the blogspot.com extension
N - number of blogs entries you want to backup, make it higher if you are not sure
illustration:
I have blog entries which is less than 100. So, I types below URL to the address bar of my internet browser.
2. Then issue a "Save As" command and locate your folder in your hard drive where do you want to store you blogs. Easy, isn't it.
>>> END
September 27, 2009
How to Compute Body Mass Index (BMI)
BMI = Weight in pounds * 703 / height in inches / height in inches
BMI normal = 18.5 - 24.9
BMI normal = 18.5 - 24.9
How to Compute Time Deposit Interest
Here is the "How to" on how to compute your earnings if you put your money in Time Deposit with the bank. I remembered several months ago when I was hopping from one bank to another along Ayala Ave. seeking a bank that gives the highest interest rates returns. Happy reading...
Legend:
P = Present Value
m = 4 if quarterly, 12 if monthly
i = Interest rate
n = Number of years
Simple Formula:
InterestEarned = [PresentValue * InterestRate * (No. of days of maturity / No. of days in a year)] * (1 - 20%)
Actual Formula:
InterestEarned = [PresentValue [(1+i/m)^m-1]] * (1-20%) / m
Tax = (1-20%)
Legend:
P = Present Value
m = 4 if quarterly, 12 if monthly
i = Interest rate
n = Number of years
Simple Formula:
InterestEarned = [PresentValue * InterestRate * (No. of days of maturity / No. of days in a year)] * (1 - 20%)
Actual Formula:
InterestEarned = [PresentValue [(1+i/m)^m-1]] * (1-20%) / m
Tax = (1-20%)
September 24, 2009
How to Backup Files to Network Drive Automatically
- I used the software Everyday Auto Backup for periodic automatic back up of my files
- it can be used to a network drive or external hard drive
- here it is, the "HOW TO"
Requirements:
1. Network drive mapped to file server

2. Everyday Auto Backup software
Link: DOWNLOAD HERE

Procedures (use Jeilyn PC as example):
1. Double click the network drive (Z: drive in this example) located at My Computer, encircled below
- it can be used to a network drive or external hard drive
- here it is, the "HOW TO"
Requirements:
1. Network drive mapped to file server

2. Everyday Auto Backup software
Link: DOWNLOAD HERE

Procedures (use Jeilyn PC as example):
1. Double click the network drive (Z: drive in this example) located at My Computer, encircled below
How to Open Video Files with VLC Using Separate Window
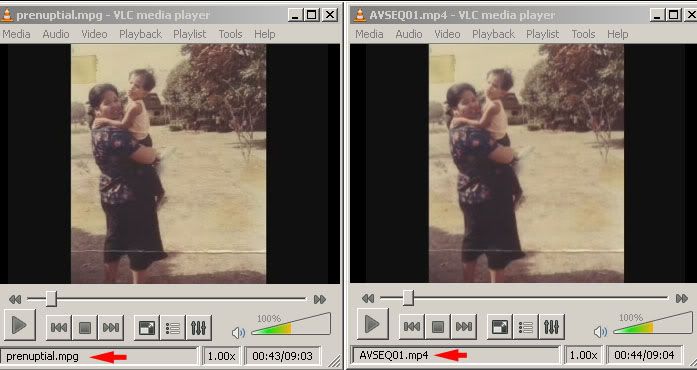
- I used this to compare the same video with different file format or watching multiple videos at the same time
1. Open VLC application
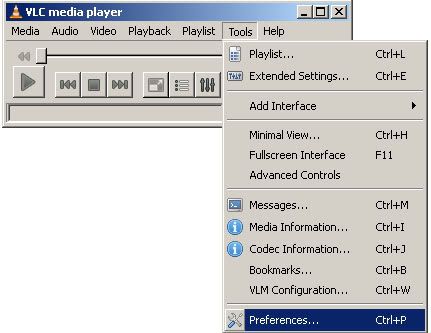
2. Go to TOOLS --> Preferences

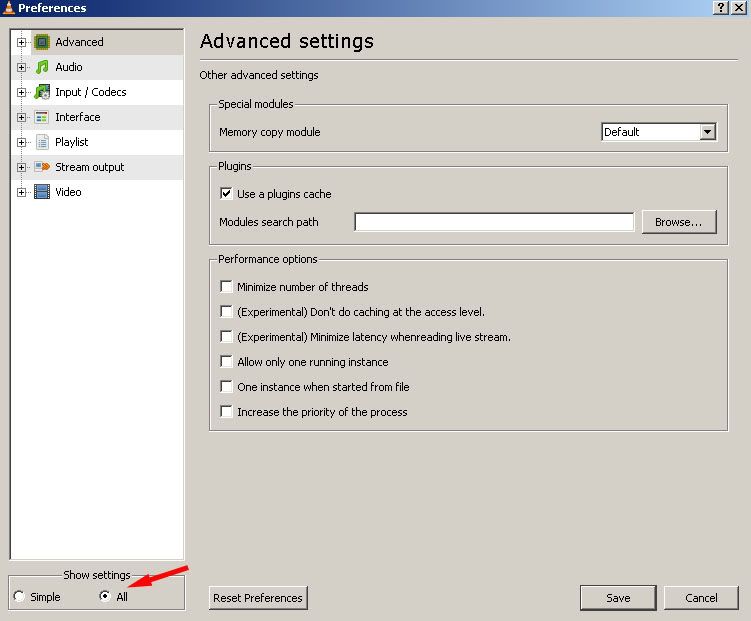
3. Select All in Show Settings located at lower left of the pop-up window

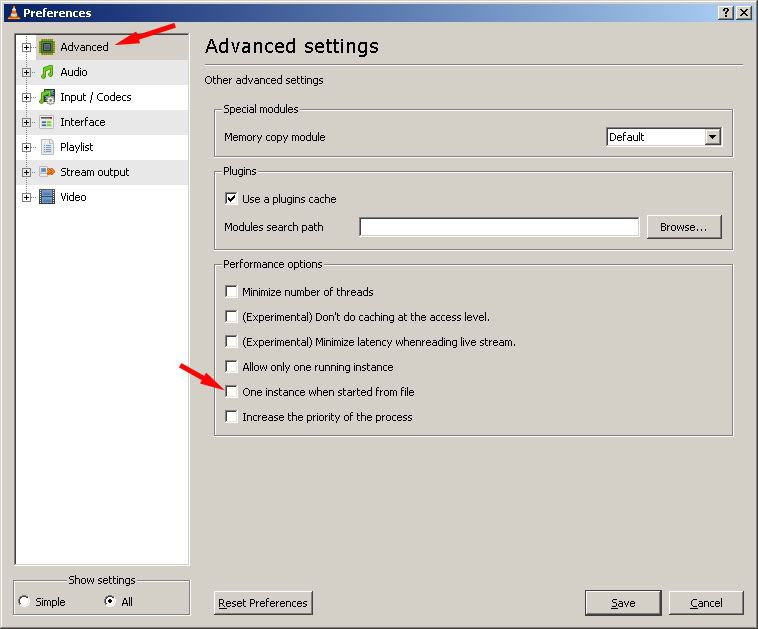
4. In advanced tab, deselect One instance when started from file

5. Results

1. Open VLC application
2. Go to TOOLS --> Preferences
3. Select All in Show Settings located at lower left of the pop-up window
4. In advanced tab, deselect One instance when started from file
5. Results
Subscribe to:
Posts (Atom)